Part 2 of 3 in Own Your Corner of the Internet. Part 1 makes the case for a website of your own. Part 3 connects it to the new social web.
You can have your own website, at your own web address, without writing a line of code and without a monthly hosting bill. I’ve built a bunch of my own sites this way, and this is the exact setup I use.
Why this setup beats a website builder:
- No code. You describe what you want in plain English. Claude writes it.
- No monthly bills. Hosting is free. Your only must-pay cost is your web address: about $11 a year.
- You own it. Your site’s files live in your own account, not locked inside a service like Squarespace or Wix.
- Fast and secure. Pages load quickly anywhere in the world, and the padlock in the browser bar is set up for you.
- Hard to break. Every version of your site is saved, so any mistake can be undone.
Meet your four helpers
You’ll set each of these up once. After that, the only one you talk to is Claude.
- Claude is your web developer. It’s an AI assistant you chat with, like texting a patient expert. You say “add an About page,” and it does.
- GitHub is your site’s filing cabinet. It’s a free service that stores the files that make up your website. It also remembers every past version, like the version history in a Google Doc.
- Cloudflare is your site’s home on the internet. It shows your site to visitors around the world, for free. It also sells web addresses (like yourname.com), and that’s the one thing you’ll pay for.
- Astro is the blueprint. It’s free software that turns your words and pictures into finished web pages. You’ll never open it yourself. Claude handles it.
By the end you’ll have a live site at yourname.com that updates whenever you ask Claude for a change. Set aside about an hour for the first run.
What it actually costs
The only bill you can’t avoid is the domain. Everything else has a free tier that covers a personal site.
| Helper | What you use it for | Cost |
|---|---|---|
| Cloudflare | Your web address (yourname.com) | About $11 a year for a .com, with no markup |
| Cloudflare | Keeping your site online | Free for a personal site |
| GitHub | Storing your site’s files | Free |
| Astro | Building the pages | Free |
| Claude | Writing and changing your site | Free plan works with copy and paste. The optional Pro plan ($20 a month, or $17 a month paid yearly) includes Claude Code, a version of Claude that edits your site directly. |
Why “almost” free: if you already pay for Claude, your only new cost is the domain. If you don’t, you can do this whole tutorial on the free plan. It just means more copying and pasting.
One tip: Cloudflare charges exactly what it pays for web addresses, with no markup, so there’s no surprise jump in year two. The base price for every .com can still change; it went up slightly on November 1, 2026. Many other companies lure you in with a cheap first year, then charge around $19 to renew.
Before you start: three free accounts
You need three accounts. Make them all with the same email so you can keep track.
- GitHub — pick a username you’re happy to show publicly
- Cloudflare — the free plan is all you need
- Claude — free works; Pro unlocks Claude Code
That’s it. No software to install yet. Claude will handle the rest when we get there.
Step 1: Launch a starter site in one click (5 minutes)
Cloudflare has a button that does the boring setup for you. It copies a ready-made Astro blog into your GitHub, builds it, and puts it online.
- Open Cloudflare’s Astro guide and click the dark Deploy to Cloudflare button. (“Deploy” just means “publish.”)
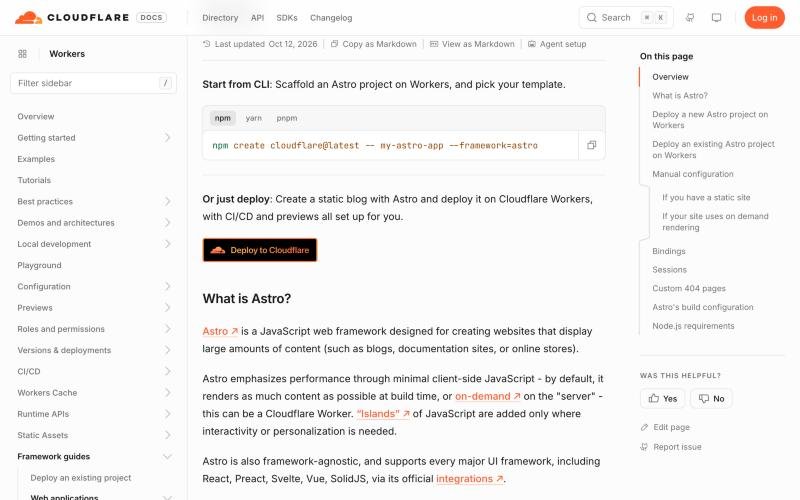 The button sits about a third of the way down the guide.
- Log in to Cloudflare. You’ll land on a page called “Set up your application.”
- Open the Git account dropdown. The first time, choose New GitHub connection. GitHub will ask you to install the “Cloudflare Workers and Pages” app. Choose your account, pick All repositories, and click Install & Authorize. This lets Cloudflare put your site’s files in your GitHub filing cabinet. Back on Cloudflare, your GitHub account now shows in the dropdown. Pick it.
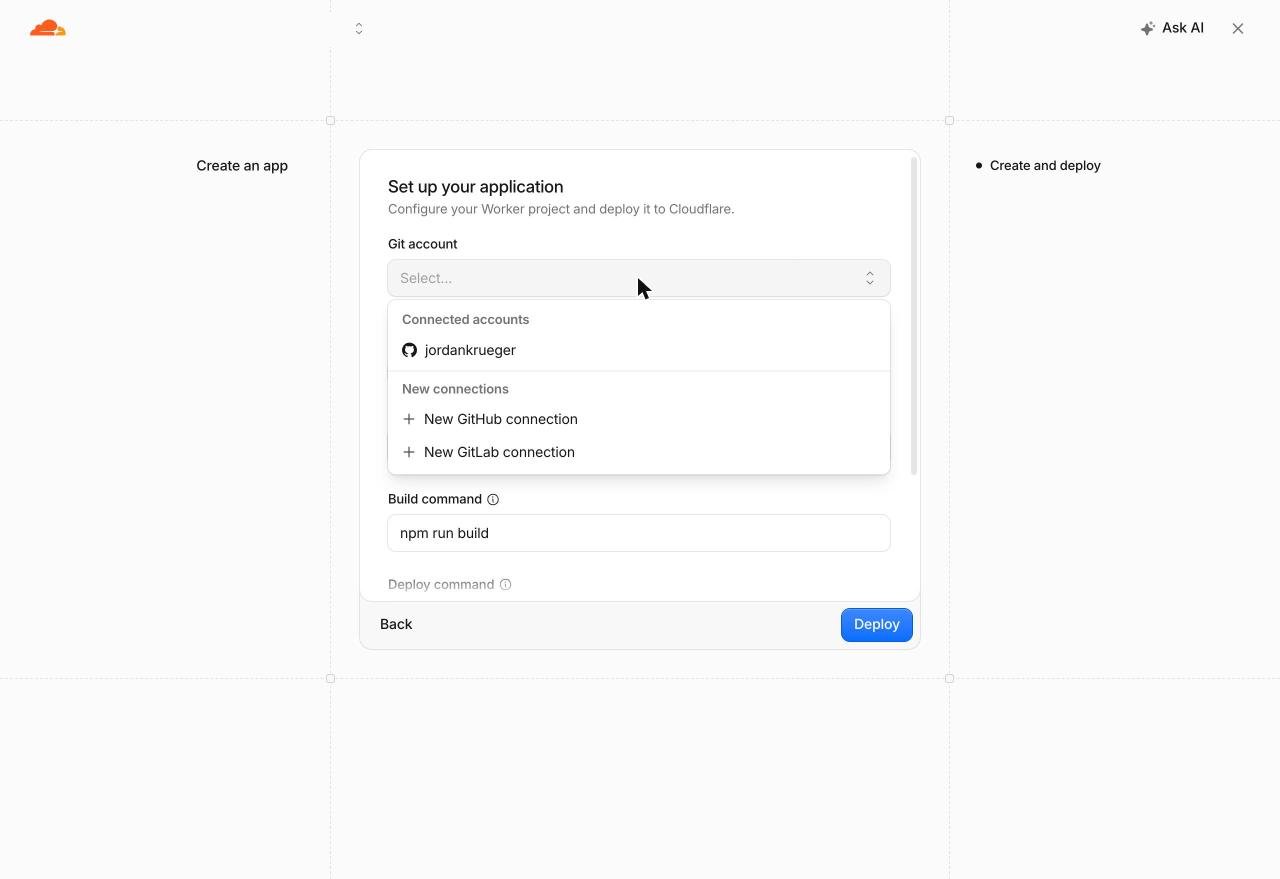 First time here? Choose New GitHub connection. After that, your account is in the list.
- Type a Project name. Something like
my-siteis fine; visitors never see it. - Click Deploy.
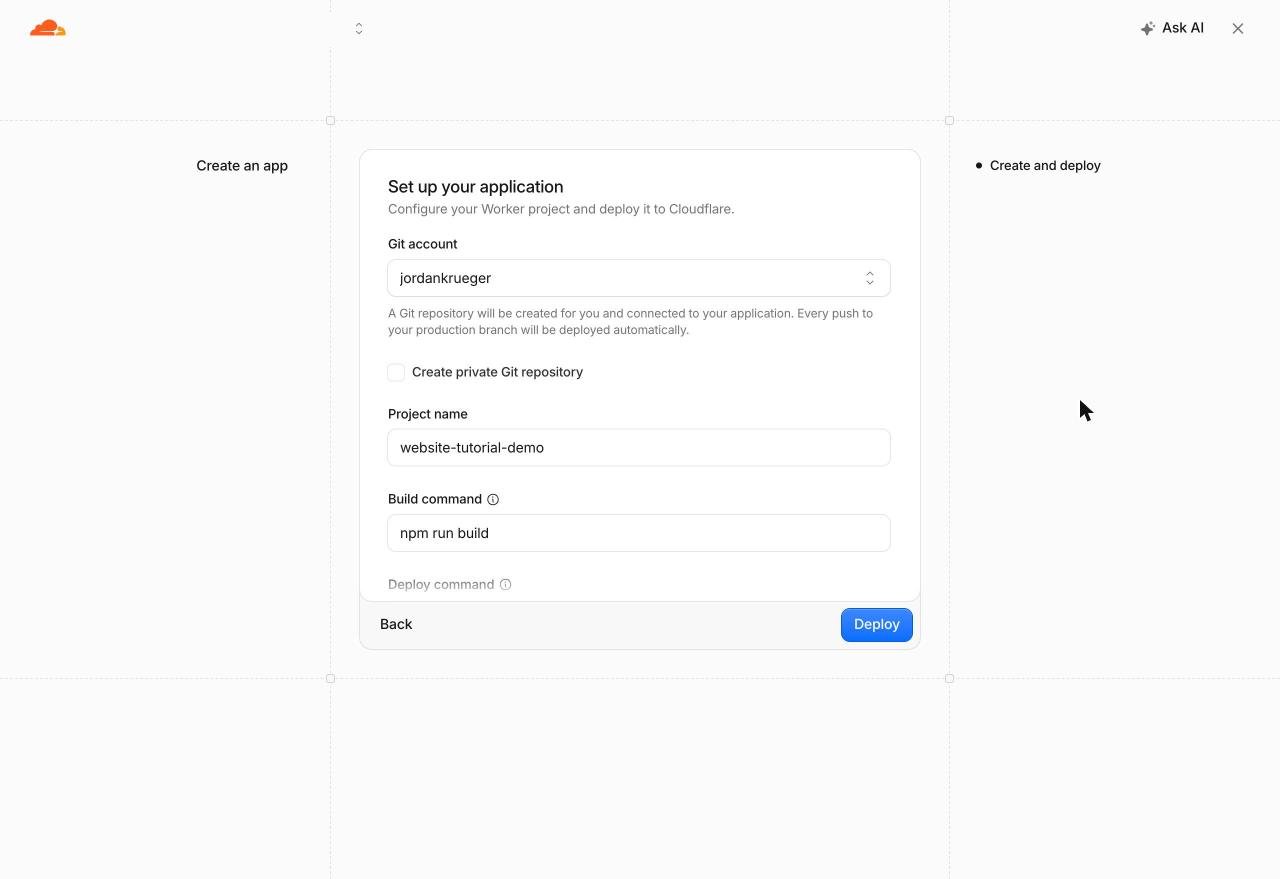 That’s the whole form. Leave the other boxes as they are.
Cloudflare now copies the starter site into a new project in your GitHub account and builds it. That takes about a minute. You can watch a live log scroll by while it works.
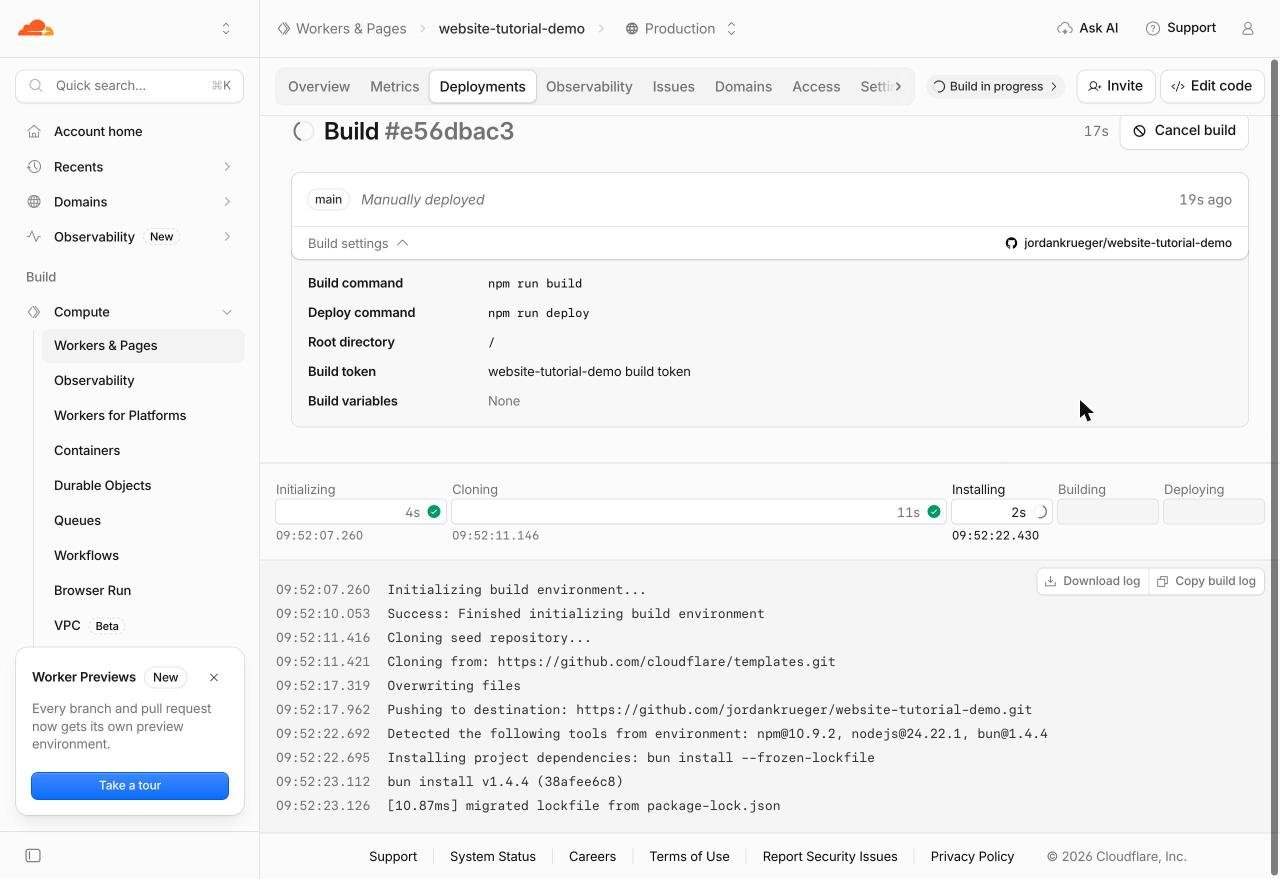 You don’t need to read the log. Just wait for it to finish.
When it’s done, your project’s Overview page shows a temporary web address ending in .workers.dev. Click Visit at the top right. That’s your website, live on the internet. You’ll swap in your own address in Step 4.
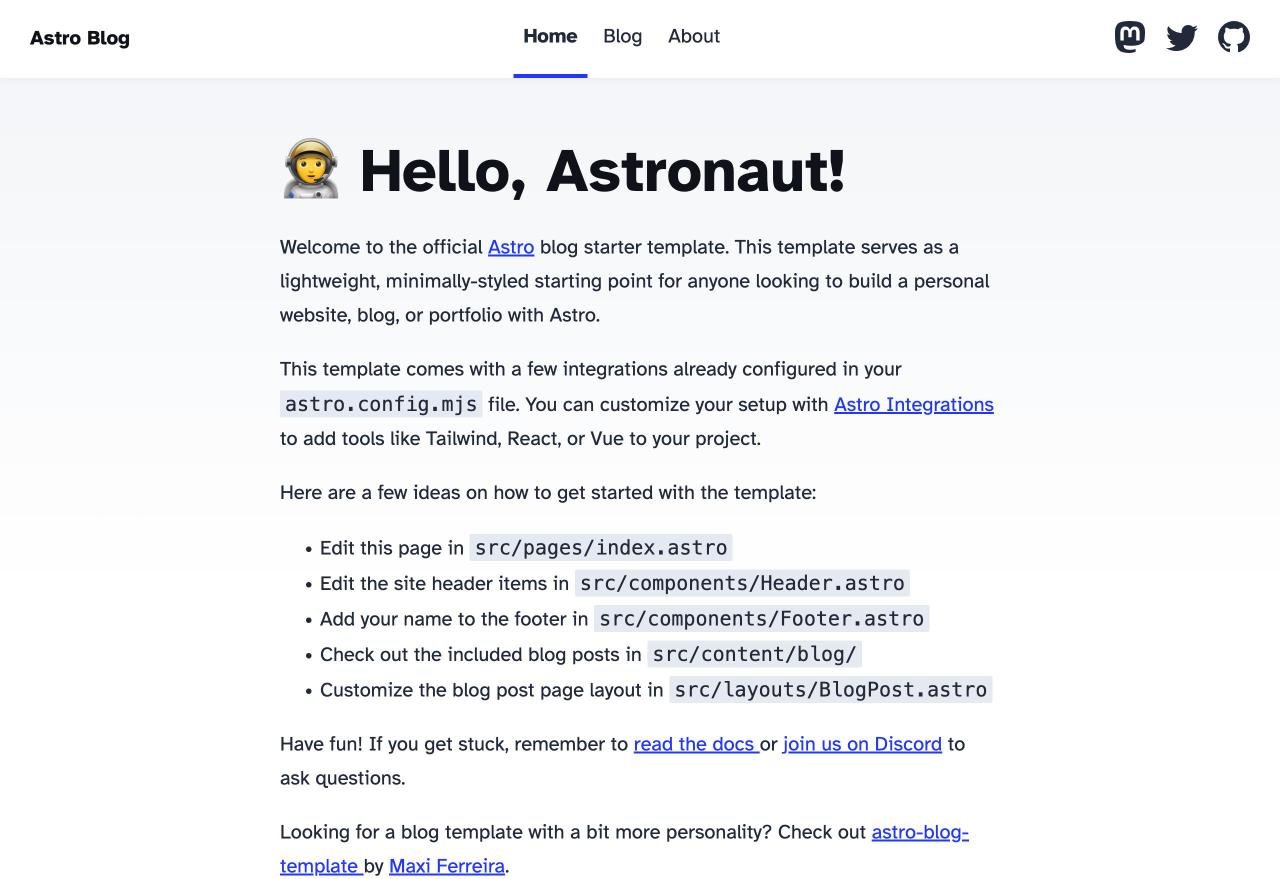 Your starter site. It’s generic for now. Step 2 fixes that.
What just happened behind the scenes: Cloudflare put a copy of the site’s files in your GitHub account, and connected the two. From now on, any change saved to GitHub goes live automatically.
Step 2: Make it yours with Claude (20 minutes)
Right now it’s a generic starter blog. Time to make it look and sound like you. Pick the path that matches your Claude plan.
Path A: Claude Code (Pro plan, easiest)
Claude Code is a version of Claude that can open your site’s files, make the changes itself, and put them back in your GitHub filing cabinet. It runs right in your web browser, so there’s nothing to install.
- Go to Claude Code on the web. Connect your GitHub account if it asks.
- Pick the Default cloud environment. Then use the Repo picker to choose the project Cloudflare just created. (“Repo” is short for repository, GitHub’s word for a project’s folder.)
- Tell it what you want in plain English, and send it. For example:
This is my personal website. Change the site name to “Josh Smith” and the tagline to “Organizer, writer, and occasional baker.” Replace the sample blog posts with one short post called “Hello, world” that I can edit later. Use a warm color palette with a dark green accent. Add an About page with a placeholder bio.
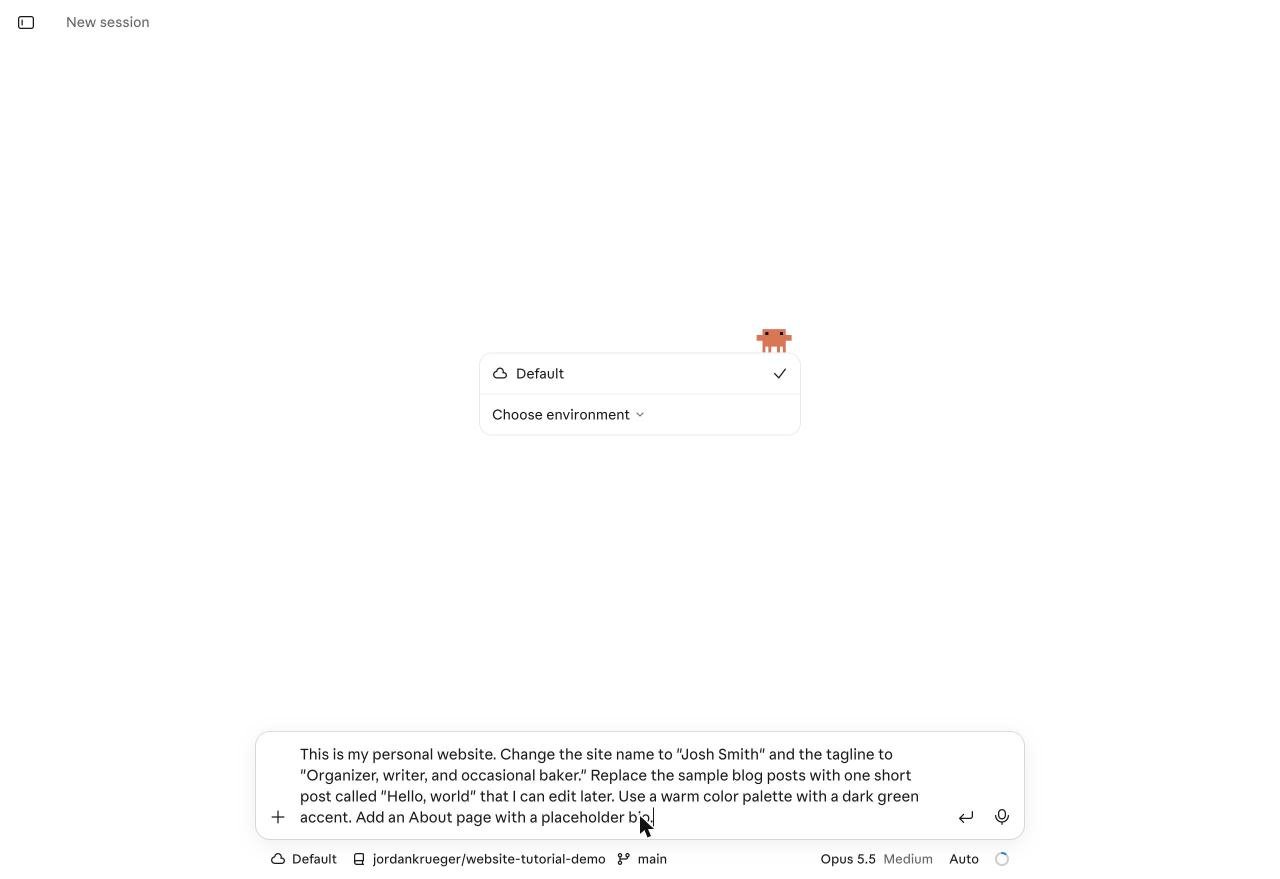 Pick the environment and the project, type your request, send.
- Claude makes the changes and explains them in plain English. It saves them as a draft “pull request,” GitHub’s term for changes waiting for your OK. It may also tidy things you didn’t ask for. In my run-through, it removed the template’s social media links and fixed a broken image. It tells you what it did, so give the list a read.
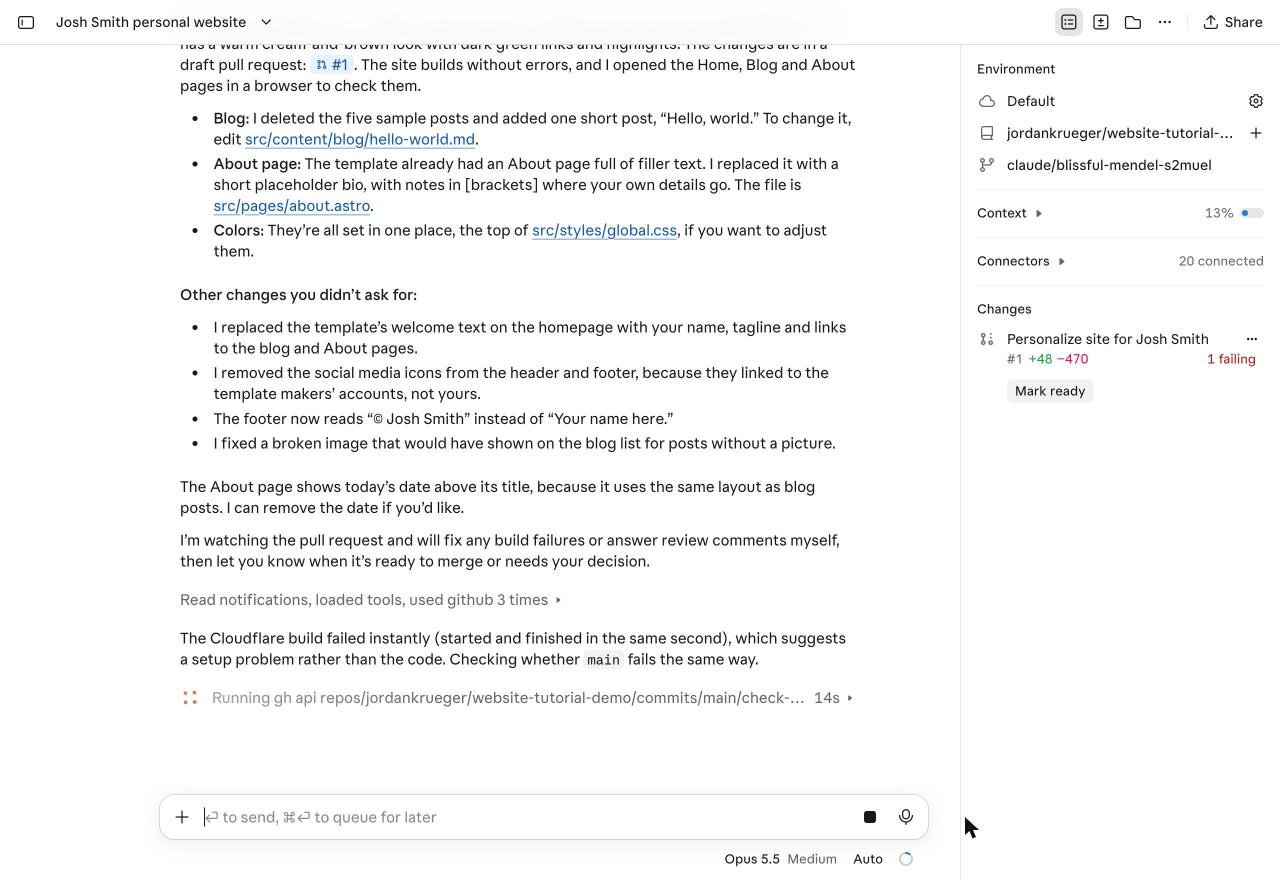 First what you asked for, then what else it changed.
Heads up: your first pull request will probably show a red X. That’s Cloudflare’s check failing. You didn’t break anything. The starter template is missing a setting Cloudflare needs for its preview builds. Open the failed check’s details and copy the error. Paste it to Claude with: “Cloudflare says the build failed. Here’s the error. Please fix it.” In my run-through, Claude fixed it in one message and the check turned green.
- To publish, open the pull request on GitHub. Click Ready for review, then Merge pull request, then Confirm merge. About a minute later, your live site updates.
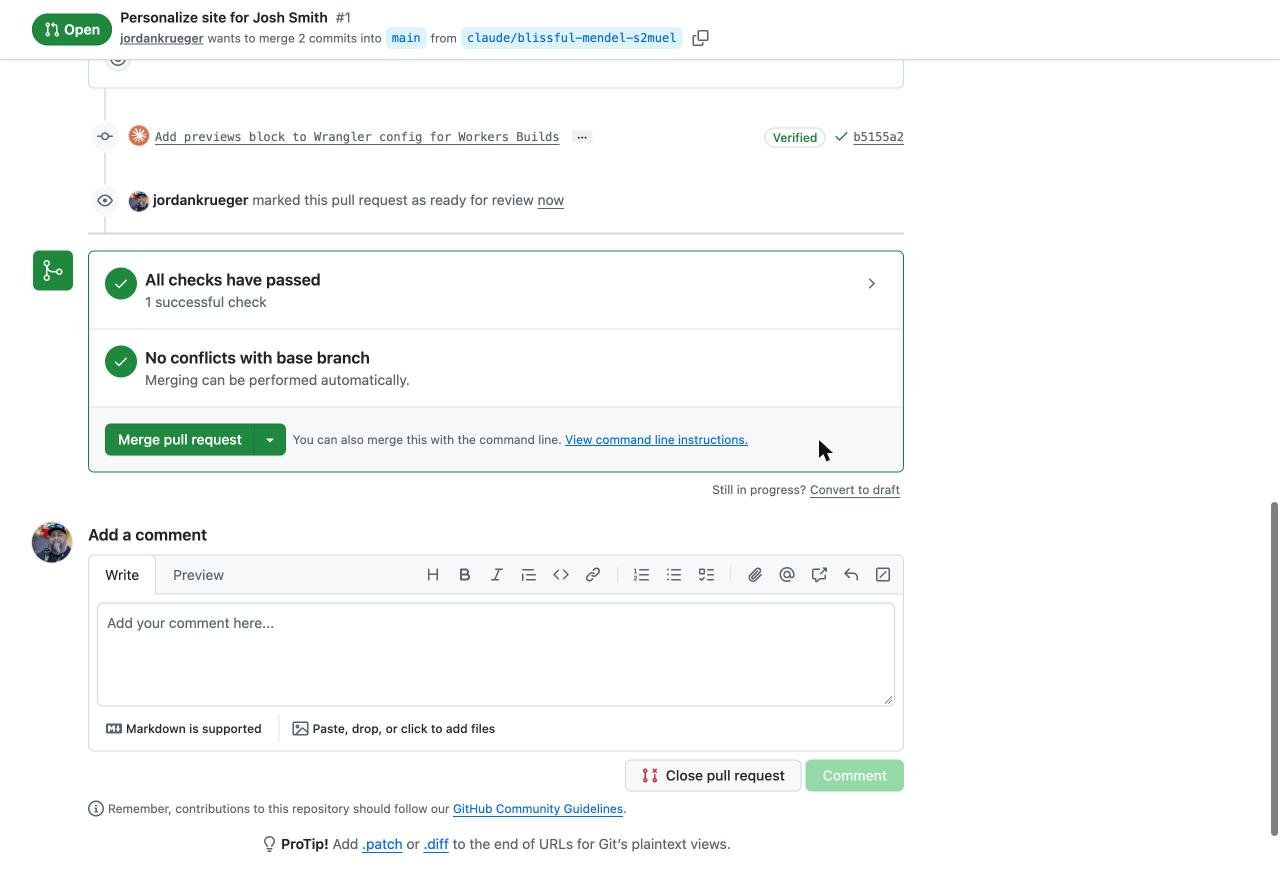 Green checks mean it’s ready to merge.
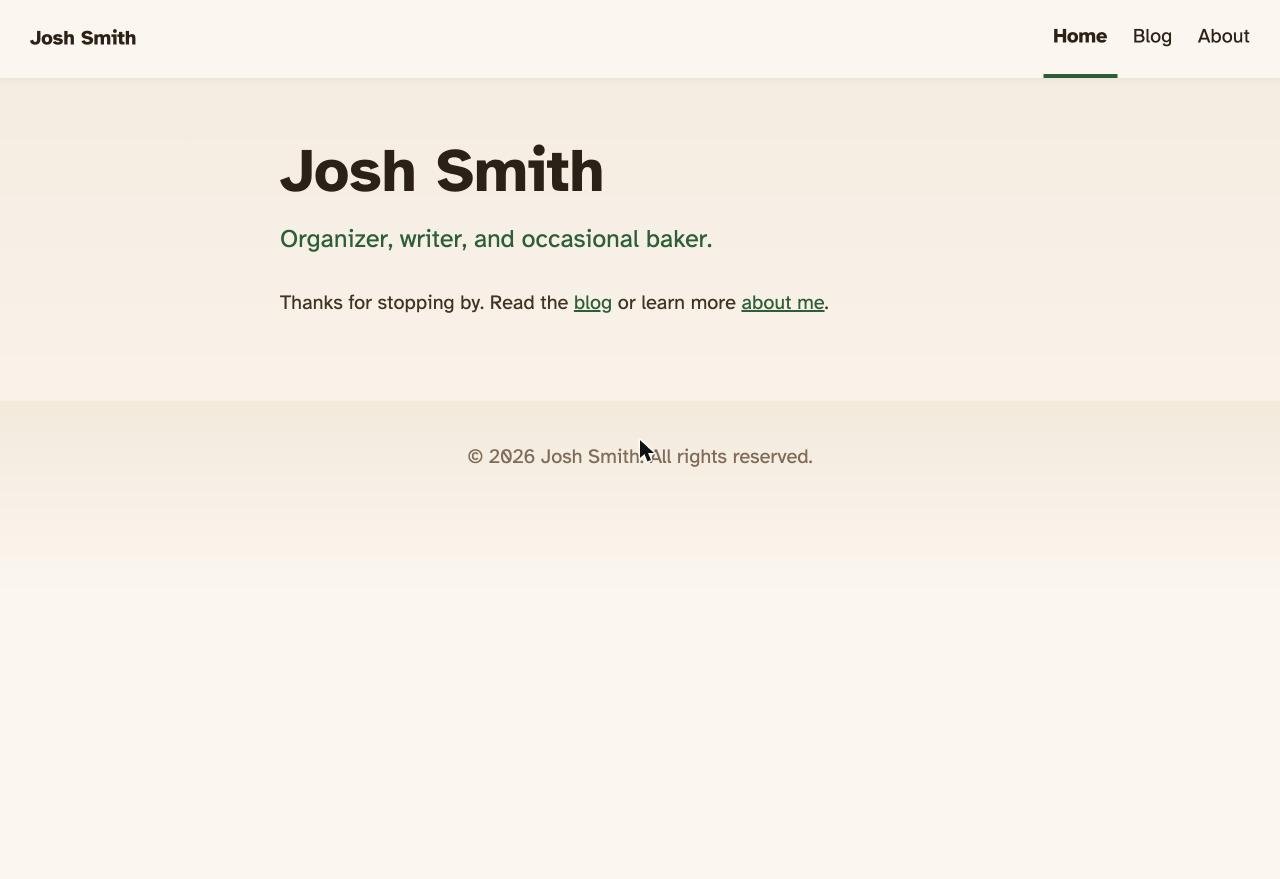 The same starter site after one request to Claude.
Path B: Free plan (copy and paste)
Slower, but it costs nothing.
- In GitHub, open your project and find the file you want to change. A good first one is
src/consts.ts, a short settings file that holds your site’s name and description. - Copy everything in the file and paste it into Claude along with your request: “Change the site title to Josh Smith and give me the full updated file.”
- Back in GitHub, click the pencil icon to edit. Paste Claude’s version over the old one, and click Commit changes… (GitHub’s word for “save”).
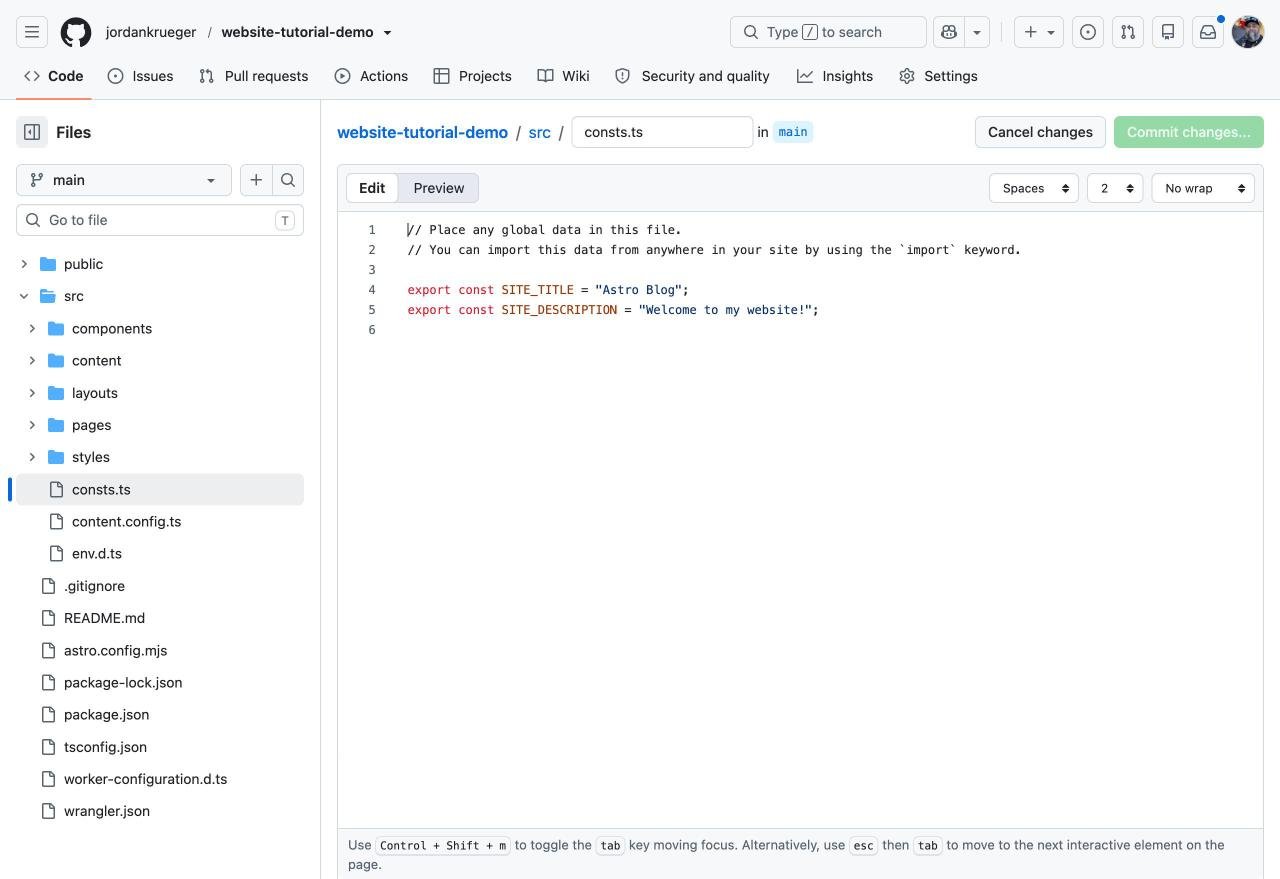 The settings file in GitHub’s editor. Your site’s name is on line 4.
Either way, Cloudflare notices the change in GitHub and rebuilds your site on its own.
Step 3: Buy your web address (10 minutes)
This is the one part that costs money. A .com runs about $11 a year at Cloudflare.
- In the Cloudflare dashboard, open Domains, then Registrations, and click Buy domain.
- Search for the name you want. Your own name is a great choice if it’s available. Each result shows the first-year price and the renewal price. A .com was $11.17 a year when I checked on November 5, 2026.
- Add it to your cart, enter your contact info, and pay.
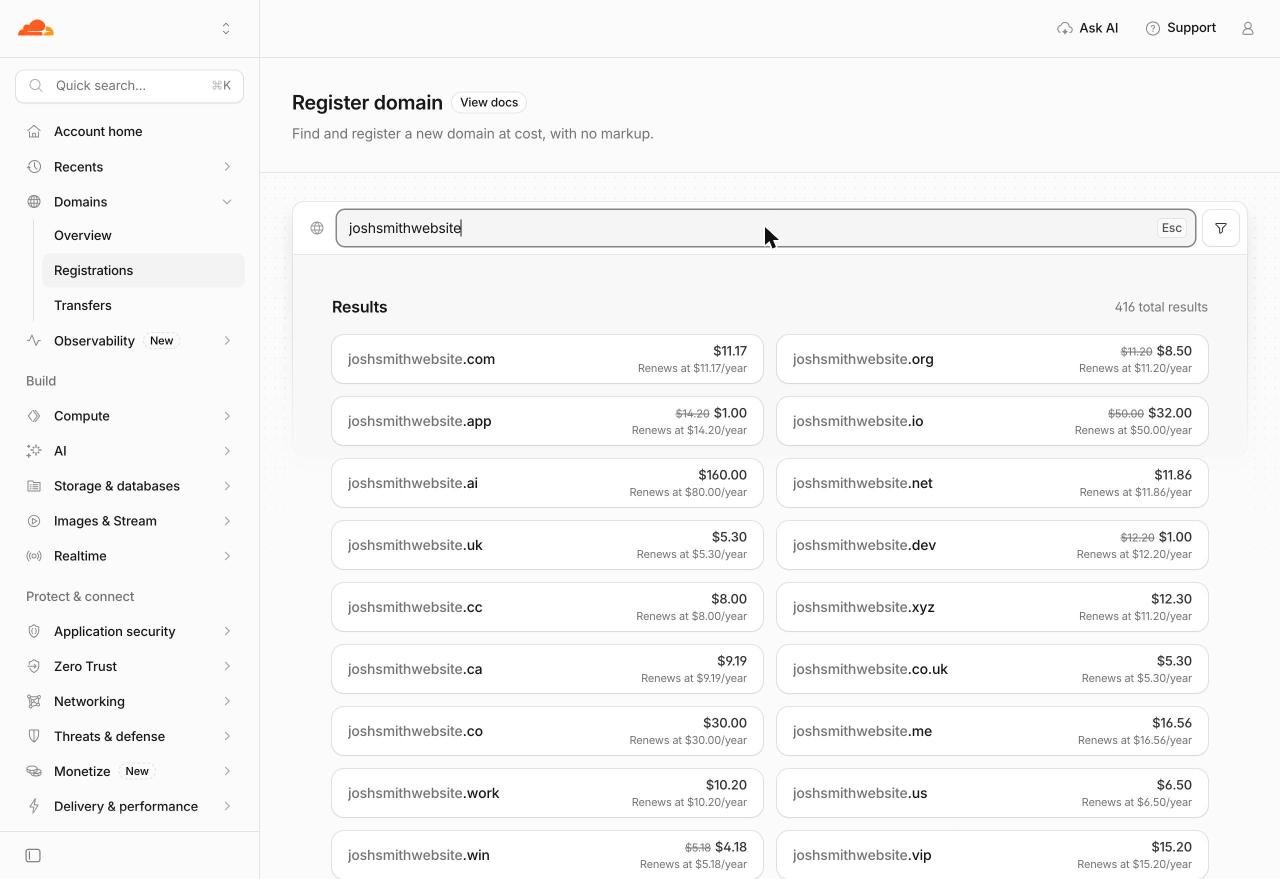 Every result shows what you pay now and what it renews at.
Normally, the owner’s contact info for a web address is public. Cloudflare hides yours for free, so your home address stays private. (A few endings, like .us, don’t allow this privacy.) Auto-renew is on by default. Leave auto-renew on so you never lose your address by accident.
Step 4: Connect your web address to your site (5 minutes)
Because you bought your web address at Cloudflare, connecting it takes a few clicks. The bold words below are the exact button and menu names you’ll see.
- In the Cloudflare dashboard, go to Workers & Pages and click your project.
- Open the Domains tab and click Add Domain.
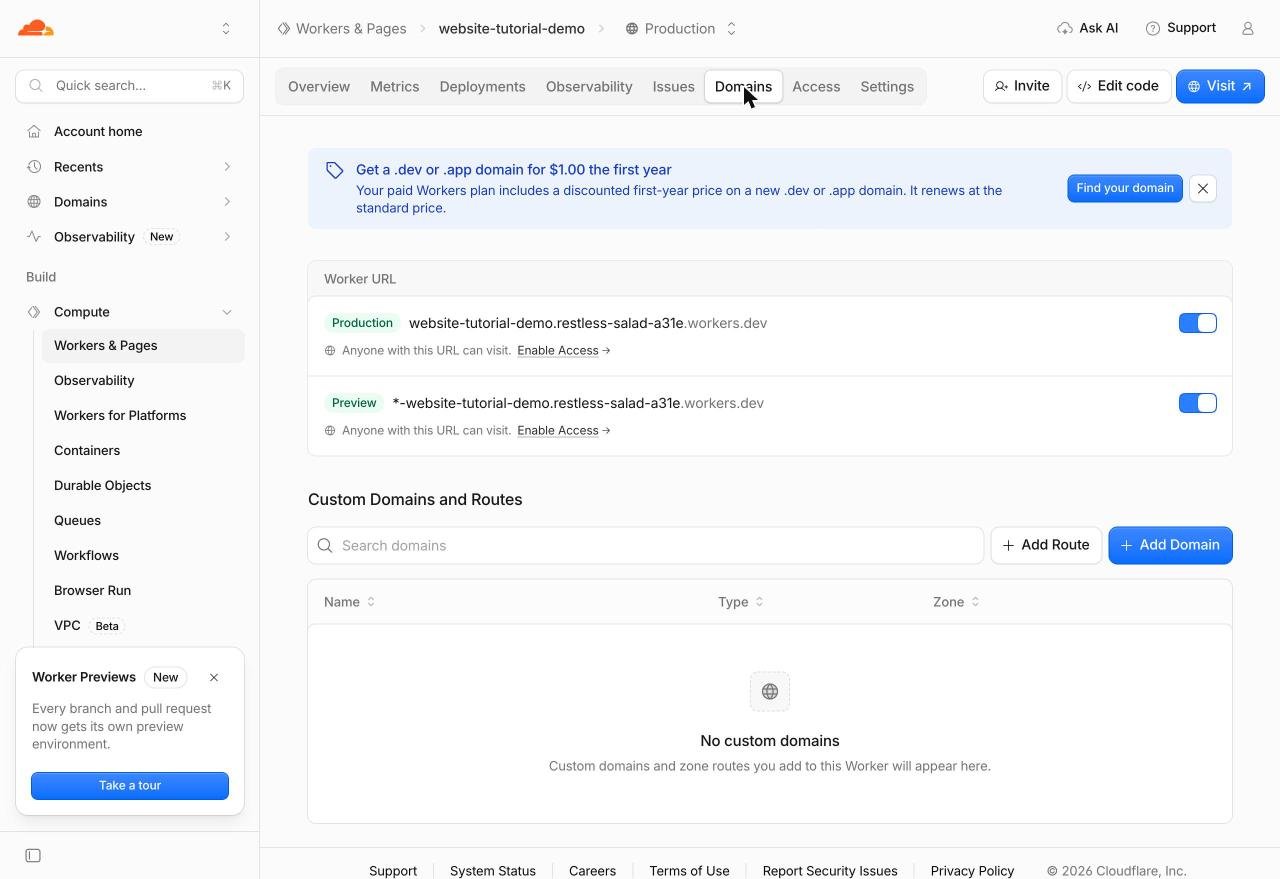 Add Domain is the blue button on the right.
- Pick your web address from the list.
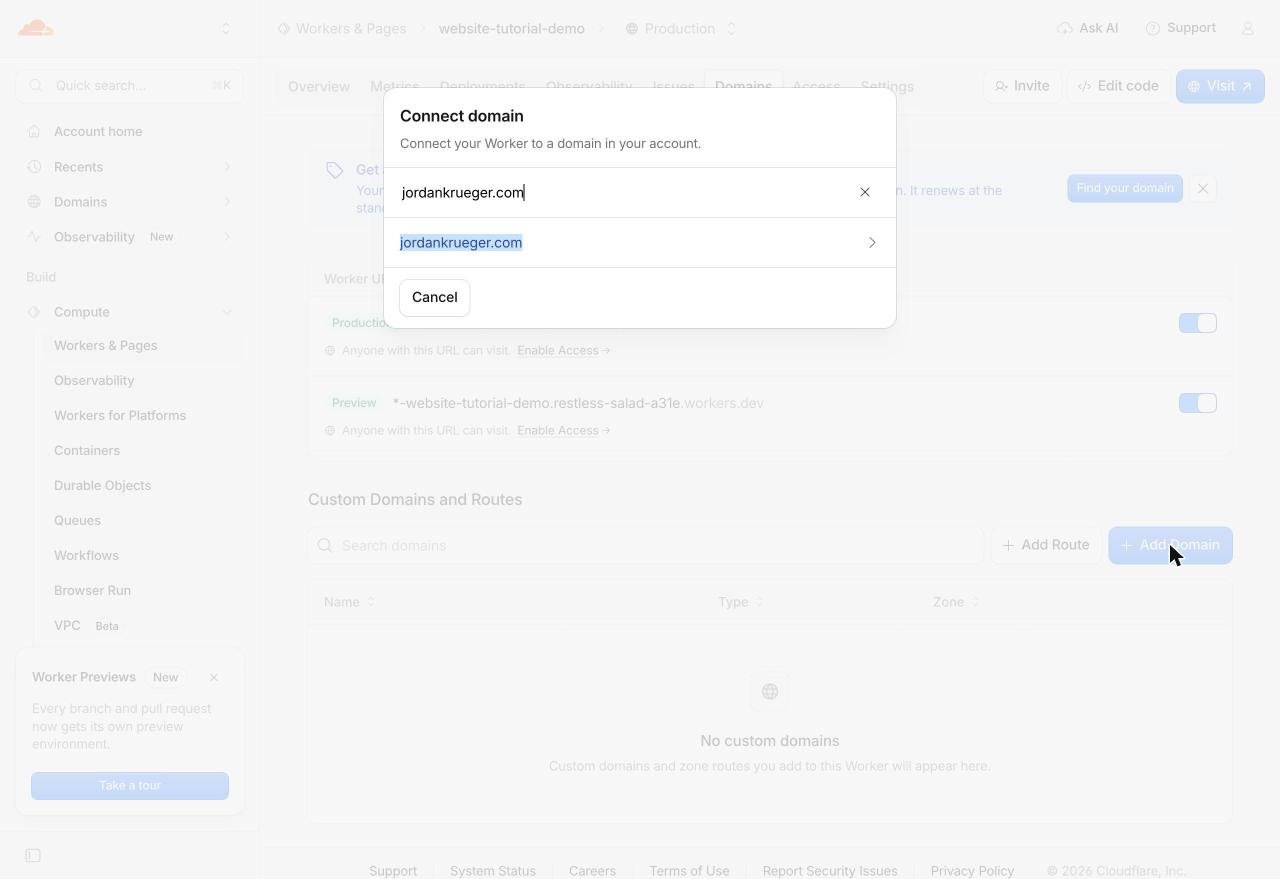 Cloudflare lists the addresses you own. Click yours.
- The Subdomain box is optional. Leave it empty to use your main address, like
joshsmith.com. Or type something likeblogto useblog.joshsmith.com. Then click Add domain.
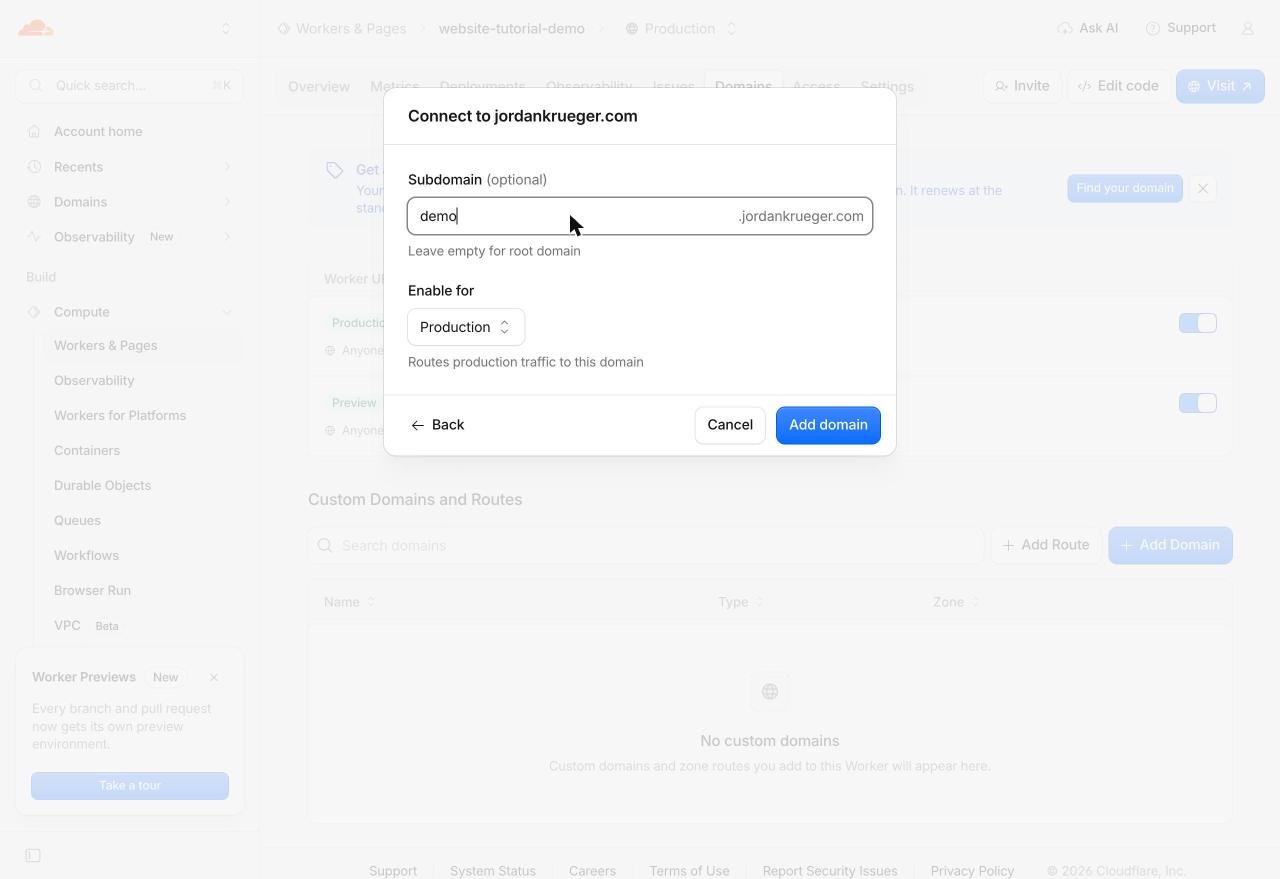 I typed “demo” for this run-through. Leave it empty for your main address.
- Ask Claude to set your web address in the site’s settings: “Change the site address in astro.config to https://joshsmith.com.” (The starter uses a stand-in,
https://example.com.)
Your address now shows under Custom Domains and Routes. Cloudflare sets up the address and the security certificate (the padlock in the browser) for you. Give it a few minutes, then visit your web address. Your site is now officially yours.
Step 5: Keep it growing
You’re done with setup. From here, every update follows the same short loop:
- Ask Claude for a change.
- Claude saves it to GitHub.
- Cloudflare rebuilds the site.
- Your change is live in about a minute.
If something goes wrong, nothing is lost. GitHub keeps every version, so you can always ask Claude to undo the last change.
Prompts worth using:
- “Write a new blog post from these notes, in my voice: [paste notes].”
- “Add a Contact page with my email and links to my social accounts.”
- “Make the homepage show my three newest posts with a short summary of each.”
- “Check the site on a phone-sized screen and fix anything that looks cramped.”
- “Add an email signup form to the bottom of every blog post.”
If you get stuck
Cloudflare says an update failed. Open your project in Cloudflare and go to the Deployments tab. Click the failed build to see its log, and copy the error message. Paste it into Claude and ask it to fix the problem. That’s exactly how the red X on my first pull request got fixed (see the heads-up in Step 2).
My change didn’t show up. Wait two minutes, then force your browser to load the newest version: press Cmd+Shift+R on a Mac or Ctrl+Shift+R on Windows. Still nothing? Check that the change actually saved in GitHub.
My web address says “not found.” A brand-new web address can take up to an hour to work everywhere. Check that it’s listed under Custom Domains and Routes on your project’s Domains tab.
Is hosting really free? For a personal site, yes. Cloudflare doesn’t charge to show simple sites like this one, and you’d need a huge amount of traffic before a paid plan came up.
Want the shortcut?
Get my free Website Starter Pack. It’s a one-page checklist of every step above, plus 20 copy-and-paste Claude prompts for building out your site: an About page, a portfolio, a newsletter signup, and more.
Built something? Send me the link. I’d love to see it, and I might feature it in a future post.
Need this set up for your organization? CampaignHelp can do it for you.
Next, Part 3: Connect your website to the Fediverse. Your web address becomes your name on Bluesky and Mastodon. Missed the start? Part 1: Why everyone should have a website.
Sources: Cloudflare Astro guide · .com price comparison, CostGoat · Claude pricing